how to use a nail dotting tool is a skill that opens up a world of creative possibilities for anyone who loves DIY manicure projects. I’ve spent years experimenting with different techniques, and the dotting tool has become my go‑to for adding texture and intrigue to a simple base coat. In this guide, I’ll walk you through every step, from selecting the right tool to finishing with a flawless top coat.
What Is a Nail Dotting Tool?
A nail dotting tool is a small, usually metal or plastic implement with a tiny, rounded tip that allows you to deposit precise amounts of nail polish onto your nails. Think of it as a miniature paintbrush—except it gives you control over the size and placement of each dot. The tool’s tip is often slightly convex, which makes it ideal for creating clean edges.
Why Use a Dotting Tool?
Many of us are stuck in the same two‑step routine: base, color, top coat. A dotting tool breaks that monotony by letting you add geometric shapes, gradients, or even miniature art scenes. It’s a low‑effort, high‑impact way to upgrade your nails, and the best part is that you can do it at home without a salon visit.


Types of Dotting Tools
- Metal tips: Durable and long‑lasting, they offer a crisp finish but can be a bit rigid for beginners.
- Plastic tips: Softer and more flexible, they’re forgiving for first‑time users but may wear out faster.
- Different sizes: Small (0.5 mm) for fine details, medium (1.0 mm) for general use, and large (1.5 mm) for bold statements.
Choosing the Right Polishes
Not all nail polish behaves the same when dotting. For beginners, pick a medium‑thickness formula that’s not too watery. A semi‑gloss or satin finish works well because it dries quickly and holds the dot shape. Avoid super‑thin “super‑thin” polishes; they tend to spread and blur the dot. If you want a metallic or glitter finish, choose a polish that’s pre‑mixed with the glitter to prevent clumping.
Tools & Accessories
- Dotting tool set: Many kits include a range of tip sizes and a storage case.
- Clear nail polish remover: For quick clean‑ups.
- Lint‑free wipes or cotton pads: Keep them handy for accidental spills.
- Small mirror or magnifying glass: Helps with detailed work on the middle nail.
- Top coat (glossy or matte): Choose based on your desired finish.
Step‑by‑Step Tutorial: How to Use a Nail Dotting Tool
1. Prep Your Nails
I always start with a clean canvas. File your nails to your preferred shape, push back cuticles, and wash your hands to remove oils that could interfere with polish adhesion.
2. Apply the Base Coat
A thin, even layer of base coat dries in about a minute. This not only protects your nails but also gives the polish a smooth surface to sit on.
3. Choose Your Color Palette
For beginners, I recommend sticking to two or three complementary colors. Neutral shades like taupe or pale pink work well with a pop of metallic or bright hue.
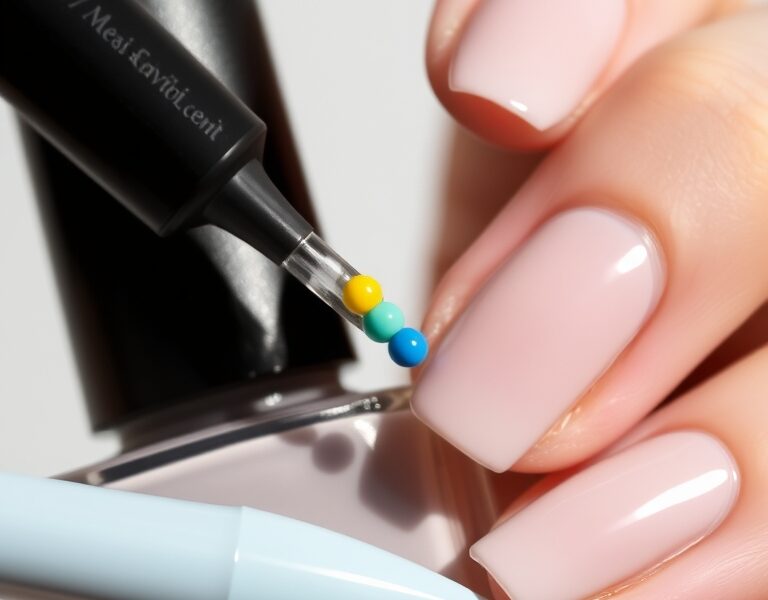
4. Load the Dotting Tool
Dip the tip of your dotting tool into the polish bottle. Don’t over‑dip—just a small splash is enough. If you’re using a large tip, you may need a second dip.
5. Place the First Dot
Hold the nail steady and press the tip lightly onto the nail surface. The dot should sit flush with the nail, not raised. Let the polish dry for 10‑15 seconds before moving on.
6. Continue Adding Dots
Keep alternating colors and sizes to create patterns. For a simple design, try a single row of dots down the middle of each nail. For something more playful, scatter dots randomly or create a spiral.
7. Layer the Top Coat
Once all dots are dry, apply a clear top coat. This seals the design, adds shine, and extends wear. Allow it to dry completely—usually 30‑60 seconds.
8. Clean Up Any Mistakes
If a dot is misplaced, use a lint‑free wipe or a cotton swab dipped in acetone to gently lift it. For larger errors, you can paint over with a thin layer of base coat and re‑apply the dotting pattern.
Beginner Design Ideas
Here are a few simple yet striking patterns you can try right away:
- Single‑Dot Accent: A single large dot in the center of each nail, surrounded by a thin ring of a contrasting color.
- Geometric Grid: Create a 2×2 grid of small dots on the nail. Use two colors—one for the dots, one for the background.
- Gradient Dots: Start with a light shade at the base of the nail and gradually switch to a darker hue as you move upward.
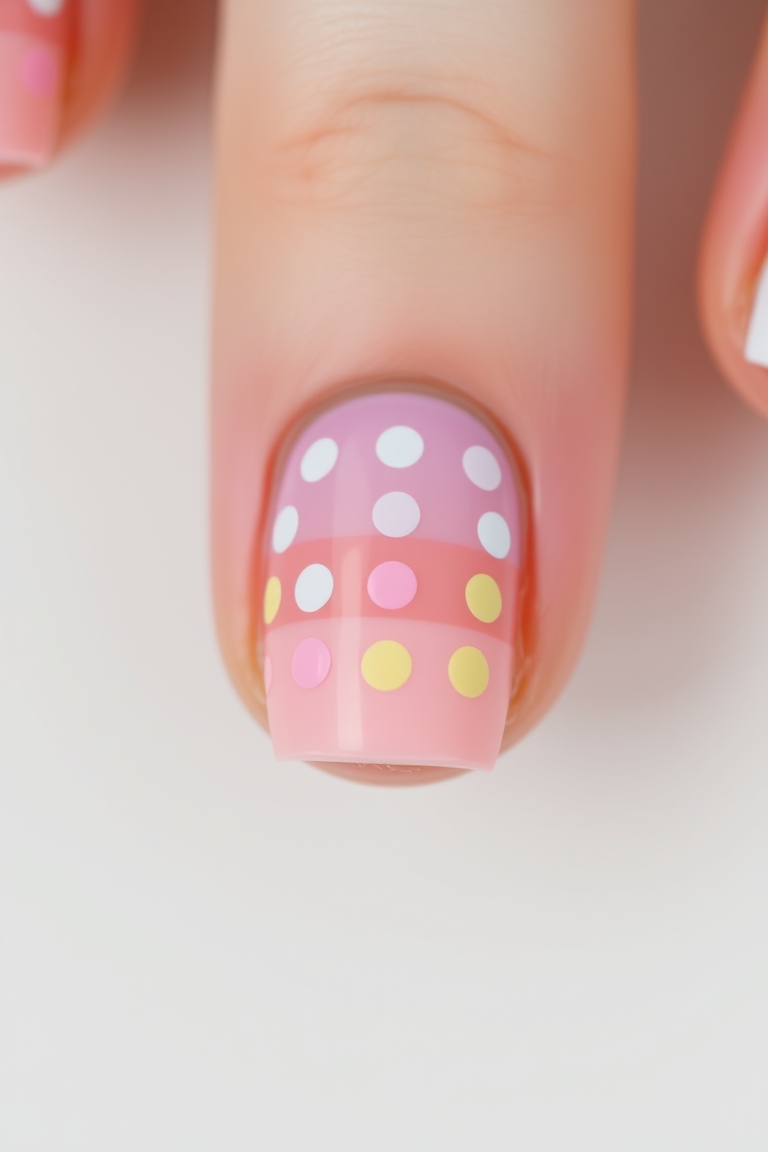
- Polka‑Dot Pattern: Spread dots evenly across the nail, varying the size for a playful look.
Seasonal & Trendy Design Ideas
Use the dotting tool to keep your nails in sync with the seasons:
- Spring: Pastel polka dots with a light green base for a fresh, airy feel.
- Summer: Bright neon dots on a matte black background for a bold, festival vibe.
- Fall: Burnt‑orange dots on a warm taupe base, accented with a touch of gold glitter.
- Winter: Silver or white dots on a deep navy or charcoal base, mimicking snowflakes.
Common Mistakes and How to Fix Them
Even seasoned nail artists slip up sometimes. Here’s what I’ve seen and how to correct it:
- Over‑dipping the Tool: Too much polish leads to blobs. Use a quick dab technique instead.
- Uneven Dot Placement: Keep a steady hand; practice on a piece of paper first.
- Polish Drying Too Quickly: If the dot dries before you can place the next one, pause and let it rehydrate with a tiny bit of clear nail polish.
- Failing to Seal: Skipping the top coat leaves the dots prone to cracking. Always finish with a top coat.
Advanced Tips for the Aspiring Pro
Once you’re comfortable with basics, experiment with:
- 3D Dots: Layer a second color on top of the first before it dries, creating depth.
- Mixed Media: Combine dots with thin stripes or stenciled shapes.
- Metallic Accents: Use a metallic polish for the dots and a matte base for contrast.
- Color‑Blocking: Place dots in bold, saturated colors against a neutral background.
Maintenance & Longevity
To keep your nails looking fresh for a week or more, follow these quick tips:
- Apply a fresh top coat every 3–4 days.
- Avoid harsh detergents for the first 24 hours after painting.
- Use a nail buffer to gently polish the surface without disturbing the dots.
Safety Tips & Nail Health
While dotting is generally safe, keep these precautions in mind:
- Never leave polish on wet nails; this can cause lifting.
- Use a base coat that contains a protective film to reduce the risk of nail damage.
- Take breaks if you notice any nail soreness or discoloration.
- Store polish in a cool, dry place to maintain viscosity.
Conclusion
Learning how to use a nail dotting tool opens up a universe of design possibilities that are both fun and accessible. With a few simple steps and a bit of practice, you can create eye‑catching nails that look like they were made in a salon—all from the comfort of your own home.
Frequently Asked Questions
- how to use a nail dotting tool for beginners?
- I recommend starting with a single, medium‑size dot on each nail, using a light color as the base. Once you’re comfortable, experiment with patterns and colors. Practice on a paper template first to master spacing.
- What is the best type of polish for dotting?
- Choose a polish with a medium consistency—neither too thick nor too watery. A semi‑gloss finish often works best because it dries quickly and holds the dot shape. Avoid super‑thin formulas that spread and blur.
- Can I use a dotting tool on a nail wrap?
- Yes, but the wrap’s texture may affect how the dots sit. Use a smaller tip and apply a light touch to prevent the wrap from absorbing too much polish.
- How long does a dotting design last?
- With proper base and top coats, a well‑applied dotting design can last up to two weeks without chipping. Re‑apply a top coat every few days to maintain shine.
- Where can I learn more about nail art techniques?
- Check out our community of nail enthusiasts on our blog for tutorials, inspiration, and tips.
Leave a Reply