Valentines Day is all about celebrating love, and what better way to show your affection than by adding a touch of romance to your fingertips? A well‑crafted manicure can turn a simple evening into a memorable experience, whether you’re planning a candlelit dinner, a spontaneous movie night, or a casual brunch with friends. The good news? You don’t need a trip to a salon or a high‑end kit to create stunning, heartfelt looks. With a few basic supplies and a dash of creativity, you can produce nails that sparkle, feel personal, and perfectly match your style.
What You’ll Need
- Base coat: A clear or light neutral shade to protect the nail and give the polish a smooth canvas.
- Polish colors: Pick two or three shades—a base, a highlight, and a subtle accent—to keep the design balanced.
- Heart stencil or dotting tool: A small stencil or a fine tip for precise hearts or dots.
- Nail file and buffer: A gentle file for shaping and a buffer for a flawless finish.
- Fine‑toothed brush: Ideal for detailing and layering colors.
- Clear top coat: Matte or glossy, depending on your vibe.
- Optional extras: A touch of glitter, a strip of metallic tape, or a tiny rhinestone for extra sparkle.
Easy Valentine Nails for Beginners
Starting with a clean, simple look is often the best way to build confidence. Below is a step‑by‑step guide to a classic heart‑shaped design that looks chic in any setting.
1. Prep Your Nails
Trim and file your nails to a shape that suits your personality—rounded, almond, or slightly tapered. A rounded edge gives the heart a soft, approachable feel. Buff the surface lightly to remove shine; this helps the polish adhere better and creates a subtle satin base.


2. Apply the Base Coat
Apply a thin layer of clear base coat and let it dry for 30–60 seconds. The base coat protects the nail from staining and gives the polish a smooth, even surface.
3. Choose Your Color Palette
For a subtle romantic vibe, opt for a pastel pink or soft rose. If you’re feeling bold, a deep burgundy or classic red can make a striking statement. Keep the base color muted so the heart detail stands out.
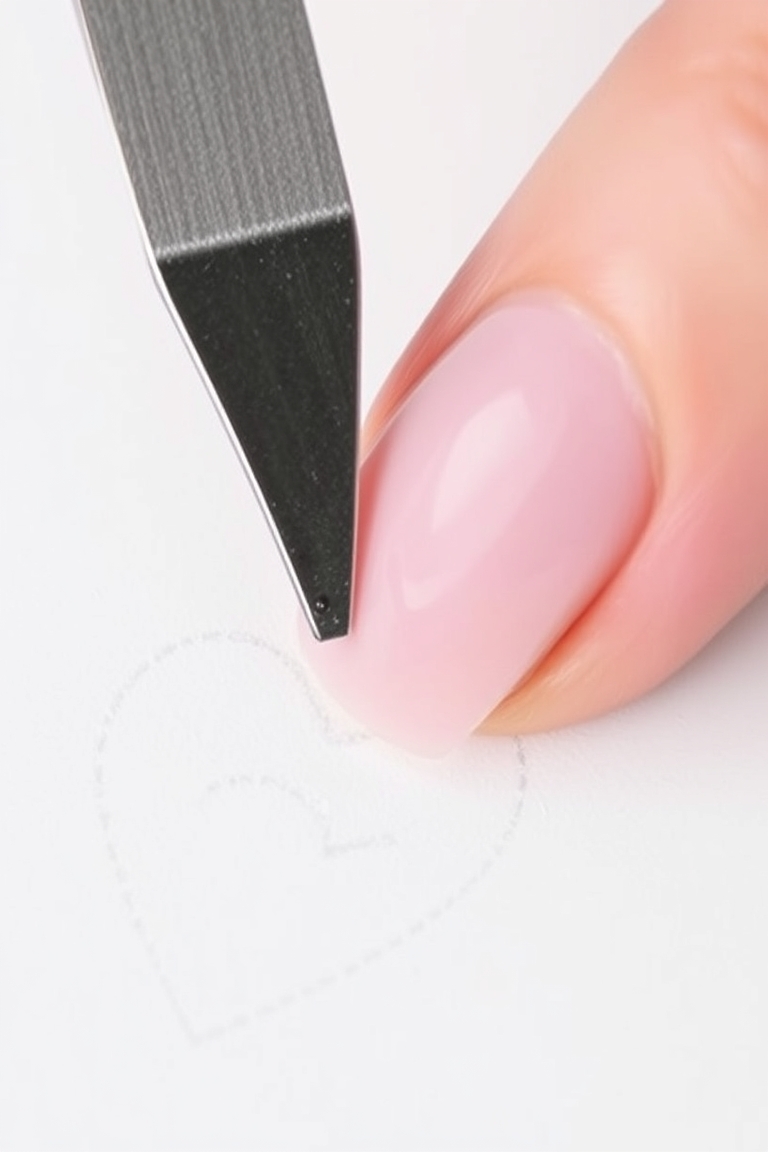
4. Create the Heart Outline
Place the heart stencil in the center of the nail. Gently press it down and trace the shape with a fine‑toothed brush or a small dotting tool. Use a lighter shade for the outline to create depth. For an extra touch, fill the heart with a gradient—start with your base color at the top and blend to a slightly darker tone at the bottom.
5. Add a Touch of Glitter or Metallic
Lightly dust the inside of the heart with fine glitter or apply a thin strip of metallic tape. This subtle sparkle can elevate the look for a special occasion.
6. Seal the Design
Finish with a clear top coat. Matte finishes give a modern, understated look, while glossy coats provide a classic shine. Let each coat dry fully—about 2 minutes—to avoid smudging.
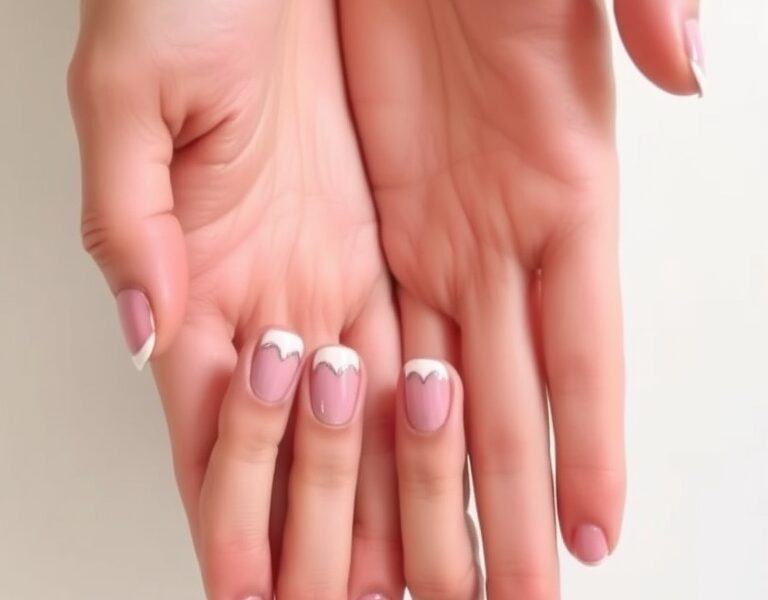
Heart Nail Art for a Classic Touch
Heart shapes are a timeless symbol of love, but you can make them feel fresh by playing with color combinations and textures.
Monochrome Hearts
Use a single color for both the nail and the heart. For example, a soft blush nail with a slightly darker blush heart creates a subtle yet elegant effect. The contrast comes from the slightly darker hue, not from a different base color.
Two‑Tone Hearts
Apply a light base color and then use a darker shade for the heart. The darker heart pops against the pale background, making an eye‑catching design that’s still understated. This style is perfect for daytime events or a casual date.
Gradient Hearts
Blend two shades of the same color from the nail’s tip to the center. Start with the lighter shade at the tip and gradually shift to the darker shade toward the heart. This creates a soft, dreamy gradient that adds dimension.
Romantic Nail Designs with a Twist
Want to step beyond the classic heart? Try these modern variations that keep the romantic spirit while adding a playful flair.
Polka Dot Love
Use a small dotting tool to place tiny hearts or stars on a neutral base. This playful approach is great for a fun, upbeat look.
Striped Romance
Apply thin horizontal stripes of a contrasting color. For a Valentine’s feel, use red or rose stripes on a soft pink background. The stripes can be subtle or bold, depending on your mood.
Matte vs. Glossy
Matte top coats give a contemporary edge, while glossy tops maintain a classic polish. Try both to see which best complements your outfit and the occasion.
Tools and Techniques for a Professional Finish
While the designs above are simple, the final look depends heavily on how well you apply the polish and finish. Here are some pro tips to keep your nails looking salon‑ready.
- Use a clean, lint‑free cloth: Wipe away any excess polish from the nail surface. This keeps your design sharp.
- Apply thin layers: Thin coats dry faster and reduce the risk of smudging.
- Let each coat dry for at least 2 minutes: Patience pays off.
- Buffer lightly after the top coat: This removes the tacky surface and gives a smooth shine.
How to Keep Your Valentine Nails Looking Fresh
Even if you’re not a professional, you can extend the life of your manicure with these simple habits.
- Apply a light coat of clear top coat every 3–4 days to maintain shine.
- Avoid using your nails as tools; consider a nail guard if you frequently scratch surfaces.
- Keep your nails moisturized with cuticle oil or a hand cream to prevent dryness.
- When you’re ready for a new look, use a gentle nail polish remover to avoid damaging the nail surface.
Variations for Every Mood
Below are a few quick variations you can try depending on your mood or the occasion.
Minimalist Love
Choose a single color for the entire nail and add a tiny heart on one nail. This subtle approach is great for a business setting.
Bold & Bright
Use bright red or hot pink for the nail base and a contrasting color for the heart. Add a dash of glitter for extra drama.
Soft Pastel Palette
Mix light pink, lavender, and mint. Paint each nail a different pastel shade and add a small heart to each. The result is a whimsical, romantic look.
Why DIY Valentine Nails Are Worth It
Creating your own nail art gives you control over every detail, from color to finish. It’s also a creative outlet that can bring a sense of accomplishment. Plus, a DIY manicure saves money while allowing you to experiment with new trends without commitment.
Internal Resources
For more step‑by‑step tutorials and nail care tips, visit Nail Made Simple and explore a variety of beginner‑friendly designs.
External Reference
For an overview of the science behind nail polish and how it adheres to the nail bed, see Wikipedia’s article on Nail polish.
Frequently Asked Questions
- Valentines day nail ideas: What are the most popular designs for a simple yet romantic look?
- How long does a DIY manicure typically last before it starts to chip?
- Can I use regular nail polish, or do I need a special formula for Valentine’s Day?
- What are some quick ways to touch up my nails between social events?
- Is it safe to apply a clear top coat over a colored nail polish that has already dried?
Leave a Reply