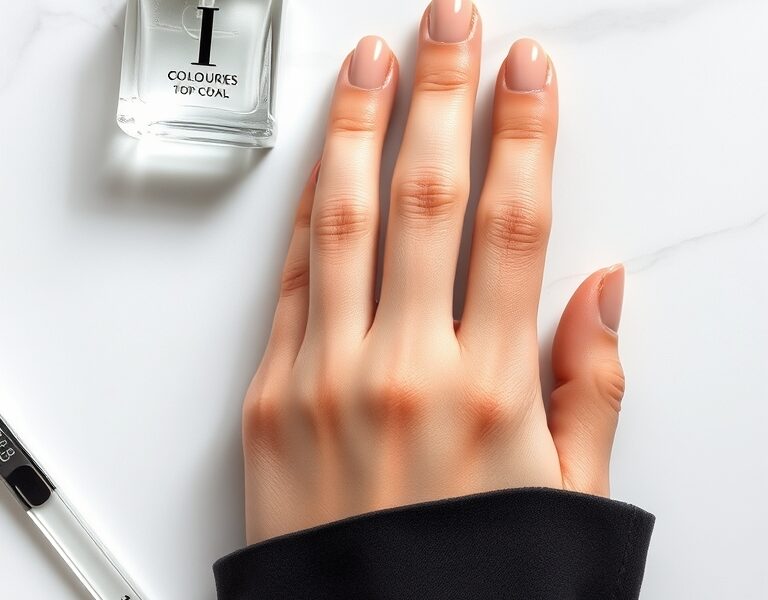
Learning how to make your manicure last longer is often the difference between a polish that chips in two days and one that stays pristine for two weeks. I used to struggle with the dreaded ‘tip wear’—where the polish disappears from the edges of my nails almost immediately after I finished painting them. After experimenting with different prep methods and application styles, I found that the secret isn’t just in the brand of polish you use, but in the ritual surrounding the process.
The Foundation: Prep Work for Chip Free Nails
Most people jump straight to the color, but the preparation phase is where the battle for longevity is won or lost. If you apply polish over oils, lotion, or invisible debris, the polish cannot bond to the nail plate, and it will peel off in sheets.
Cleanse the Nail Plate
Start by removing any old polish completely. Even a tiny sliver of old lacquer can create a bump that leads to a chip. I recommend using a lint-free wipe soaked in acetone. Once the polish is gone, avoid the temptation to apply hand cream or cuticle oil immediately. While hydration is great, oils are the enemy of adhesion. If you have already applied lotion, wipe each nail with a bit of rubbing alcohol or a dedicated nail cleanser to strip away the residue.


Proper Shaping and Buffing
Jagged edges are prone to snagging, and a snag is the fastest way to ruin a manicure. Use a fine-grit file to shape your nails in one direction. Sawing back and forth can create micro-fractures in the nail plate. Lightly buffing the surface of the nail with a high-grit buffer can help remove surface oils and create a slightly textured surface for the base coat to grip onto. However, be careful not to over-buff, as thinning the nail plate makes it more flexible, which can actually cause the polish to crack.
Managing the Cuticles
Polish that touches the skin or cuticle will lift. Once the polish lifts at the cuticle, water and soap get underneath the layer, causing the rest of the manicure to peel. Gently push back your cuticles with a wooden orange stick or a silicone pusher. If there is a thin layer of dead skin (the pterygium) still attached to the nail plate, carefully remove it. This ensures the polish sits only on the nail, not the skin.
Mastering the Application Process
Once your nails are prepped, the way you apply the product determines how long it stays put. The goal is to create a flexible, cohesive seal over the nail.
The Importance of the Base Coat
Never skip the base coat. A good base coat acts as a double-sided tape; it bonds to the natural nail and provides a sticky surface for the color. It also prevents staining, especially when using deep reds or blues. Apply a thin, even layer and let it dry completely before moving to the color.
Thin Layers Over Thick Coats
The most common mistake I see is applying one thick coat of color to save time. Thick layers trap solvents, meaning the polish stays soft in the middle for hours or even days. This leads to bubbles and easy chipping. Instead, apply two to three very thin coats. If the first coat looks streaky, leave it. The second and third coats will build the opacity and depth without compromising the structural integrity of the polish.
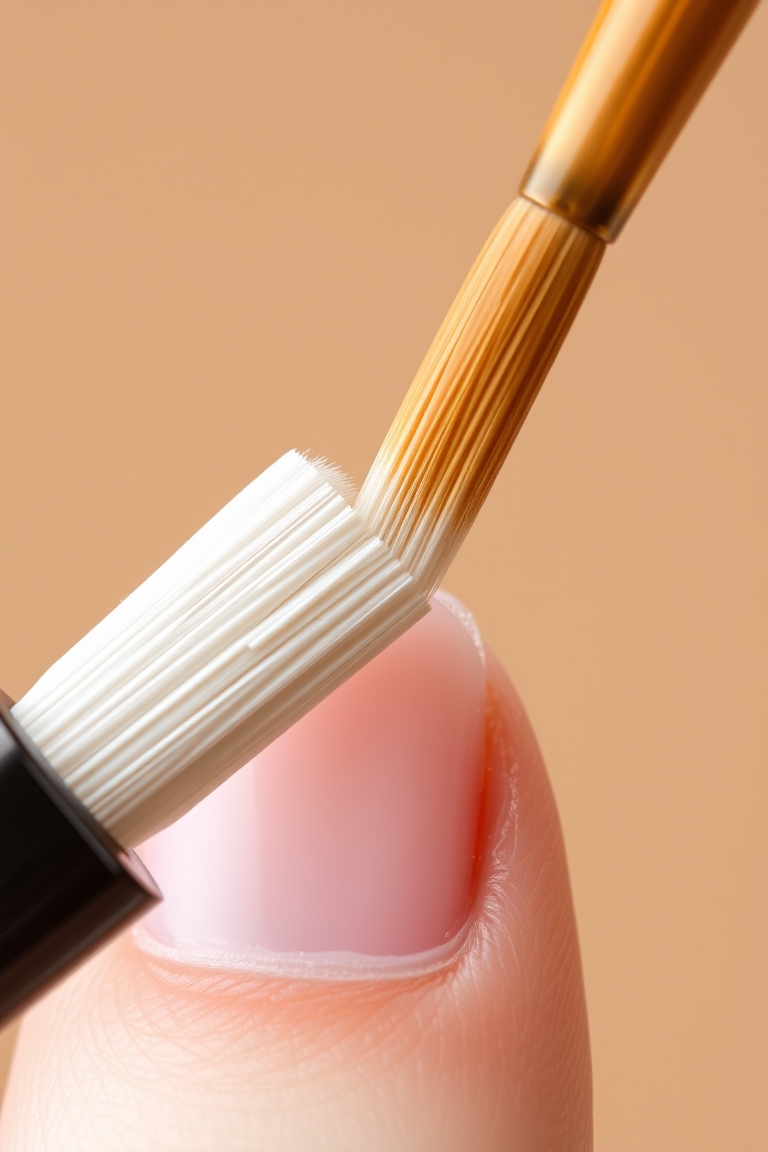
Capping the Free Edge
This is the single most effective trick for a manicure that lasts. After painting the surface of the nail, take your brush and run it horizontally across the very tip (the free edge) of the nail. This “caps” the polish, wrapping it around the edge to create a physical barrier against friction. Do this with both the color and the top coat. By sealing the edge, you prevent water from seeping between the polish and the nail.
The Final Seal: Top Coat Strategies
The top coat is your armor. It protects the pigment from UV rays and physical wear and tear. To truly make polish last, you need a strategy for your top coat.
Choosing the Right Finish
Quick-dry top coats are wonderful for convenience, but some can shrink over time, pulling away from the edges of the nail. For maximum longevity, consider a high-gloss, long-wear top coat. If you prefer a matte look, apply a glossy coat first for strength and then a matte layer on top for the aesthetic.
The Re-Application Ritual
A manicure doesn’t have to be a “set it and forget it” process. To keep your nails chip free, apply a very thin layer of top coat every two to three days. This fills in microscopic scratches and reinforces the seal on the free edge. It essentially resets the clock on your manicure’s lifespan.
Daily Maintenance and Protection
Even the most perfect application can be undone by harsh environment and habits. Your nails are porous and can be affected by the chemicals they encounter.
The Glove Rule
Water is the enemy of a long-lasting manicure. When your nails soak in water, they expand; when they dry, they contract. This constant expanding and contracting causes the rigid polish to crack. Always wear rubber gloves when washing dishes, cleaning the bathroom, or using harsh chemicals. This simple habit can add several days to the life of your polish.
Hydration Without Interference
While you should avoid oils during application, you should embrace them during maintenance. Use a cuticle oil every night. Dry nails become brittle and are more likely to bend, which causes the polish to snap. Keeping the surrounding skin and the nail plate hydrated ensures the nail remains flexible. Apply the oil to the cuticles and under the free edge of the nail.
Avoid Using Nails as Tools
It is tempting to use your nail to scrape off a sticker or open a soda can, but this is a recipe for immediate chipping. Use a letter opener, a screwdriver, or your finger pads. Any mechanical stress on the tip of the nail will compromise the seal you created during the capping process.
Troubleshooting Common Manicure Failures
If you are still seeing chips despite following these steps, you may need to analyze the specific way your polish is failing.
- Peeling at the base: This usually means you got polish on your cuticles or didn’t clean the nail plate well enough.
- Bubbles in the polish: This happens if you shake the bottle (try rolling it between your palms instead) or if you apply the polish in a drafty room or under a fan.
- Cracking across the nail: This is often a sign that your nails are too dry or the polish is too thick and rigid. Focus more on cuticle oil and thinner layers.
- Rapid tip wear: This indicates a failure to cap the free edge or a lack of top coat maintenance.
Comparing DIY Methods to Professional Services
While we focus on DIY, it is helpful to understand why some people opt for professional options. Gel manicures use a UV/LED light to polymerize the polish, creating a hard plastic-like shell. While this is durable, it can be taxing on the natural nail if removed incorrectly. By following the nail care routines mentioned here, you can achieve results that rival professional services without the need for specialized equipment or harsh removal chemicals.
For those interested in the chemistry of nail lacquers, you can read more about the composition of polymers and solvents on Wikipedia to understand why drying times and layer thickness are so critical to the bond.
Advanced Tips for Extreme Longevity
If you have a special event and need your nails to be absolutely perfect, there are a few extra steps you can take.
The Cold Water Dip
Once your top coat has set for about five to ten minutes, some people swear by dipping their fingers into a bowl of ice water. This helps “set” the top layer more quickly. While it doesn’t cure the polish like a UV lamp, it can reduce the chance of accidental smudges during the critical first hour of drying.
The “Sandwich” Technique
For very thin nails that tend to peel, try a sandwich technique: Base coat, one layer of a clear strengthening polish, two layers of color, and two layers of top coat. The strengthening layer adds a physical buffer that prevents the natural nail from bending too much under the polish.
Choosing the Right Color
Interestingly, the color you choose can affect how long the manicure looks fresh. Very dark colors (black, navy, deep burgundy) show chips much more prominently than nudes, sheers, or light pinks. If you are in a phase where you are still mastering your technique, start with lighter shades. The chips are less visible, which reduces the stress of maintenance.
Summary Checklist for a Long Lasting Manicure
- Prep: Remove all old polish, push back cuticles, and wipe nails with alcohol.
- Base: Apply one thin layer of high-quality base coat.
- Color: Apply two to three thin coats, allowing each to dry.
- Seal: Cap the free edge with both color and top coat.
- Finish: Apply a glossy top coat and re-apply every 3 days.
- Protect: Wear gloves for chores and apply cuticle oil nightly.
Frequently Asked Questions
How to make your manicure last longer when using regular polish?
The most effective way to extend the life of regular polish is to ensure the nail plate is completely free of oils before starting, apply thin layers of polish, cap the free edge of the nail, and re-apply a top coat every few days to maintain the protective seal.
Why does my polish always chip at the tips?
Tip chipping usually occurs because the polish hasn’t been “capped” (painted across the edge of the nail), or because the nails are absorbing water, causing the polish to lift. Capping the edge and wearing gloves during water-heavy tasks will prevent this.
Does cuticle oil make polish peel?
Not if applied correctly. Applying oil before painting will definitely cause peeling because the polish cannot adhere to an oily surface. However, applying oil after the manicure is dry is essential for keeping the nail flexible and preventing cracks.
How many layers of top coat are too many?
Generally, two layers of top coat are sufficient. Applying too many layers can make the manicure look bulky and may actually lead to more peeling, as the thick layer of polish becomes too rigid and loses its ability to move with the natural nail.
Can I use a base coat and a top coat from different brands?
Yes, you can. While some brands design their systems to work together, the chemistry of most base and top coats is similar enough that mixing brands will not negatively impact the longevity of your manicure.
Leave a Reply