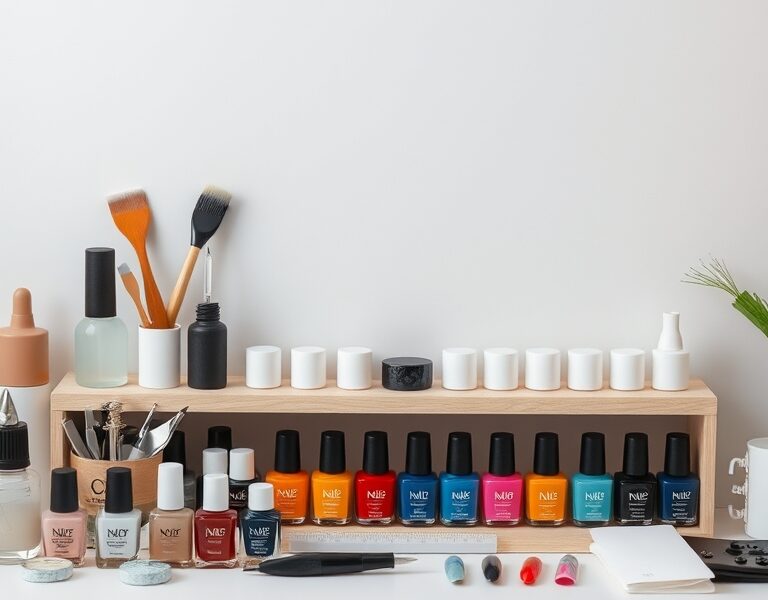
Nail art tools for beginners are the foundation of any creative manicure journey. When I first dipped my toes into the world of nail art, I found myself overwhelmed by the sheer number of options. Over time, I distilled the chaos into a clear, manageable list that anyone can follow. This guide walks you through the must‑have items, how to organize them, and practical techniques to help you grow from a novice to a confident nail artist.
Nail Art Tools for Beginners: The Core Essentials
- Base and Top Coats – Protect your nails and give polish a glossy finish.
- Quality Nail Polish – Choose a few shades that complement each other for versatility.
- Dotting Tools – A set of small brushes or a dotting pen for precise patterns.
- Striping Brushes – Fine‑tipped brushes for lines and borders.
- Gel Nail Kit (Optional) – For those looking to experiment with longer wear.
- Cuticle Care Set – Cuticle oil, pusher, and a gentle file.
- Buffer and Nail File – Smooths the surface and shapes the nail.
- UV/LED Lamp – Needed if you use gel polish.
- Removal Products – Acetone or gel remover for clean removal.
- Cleaning Brushes – Small brushes to remove excess polish from nail beds.
- Glitter and Rhinestones – For a touch of sparkle.
- Stamping Plates – Quick way to add intricate designs.
- Airbrush (Optional) – For a professional, even finish.
These tools cover the basics and give you the flexibility to explore more advanced techniques as you grow. I keep my kit organized in a small, clear container with labeled sections so I can find anything in seconds.
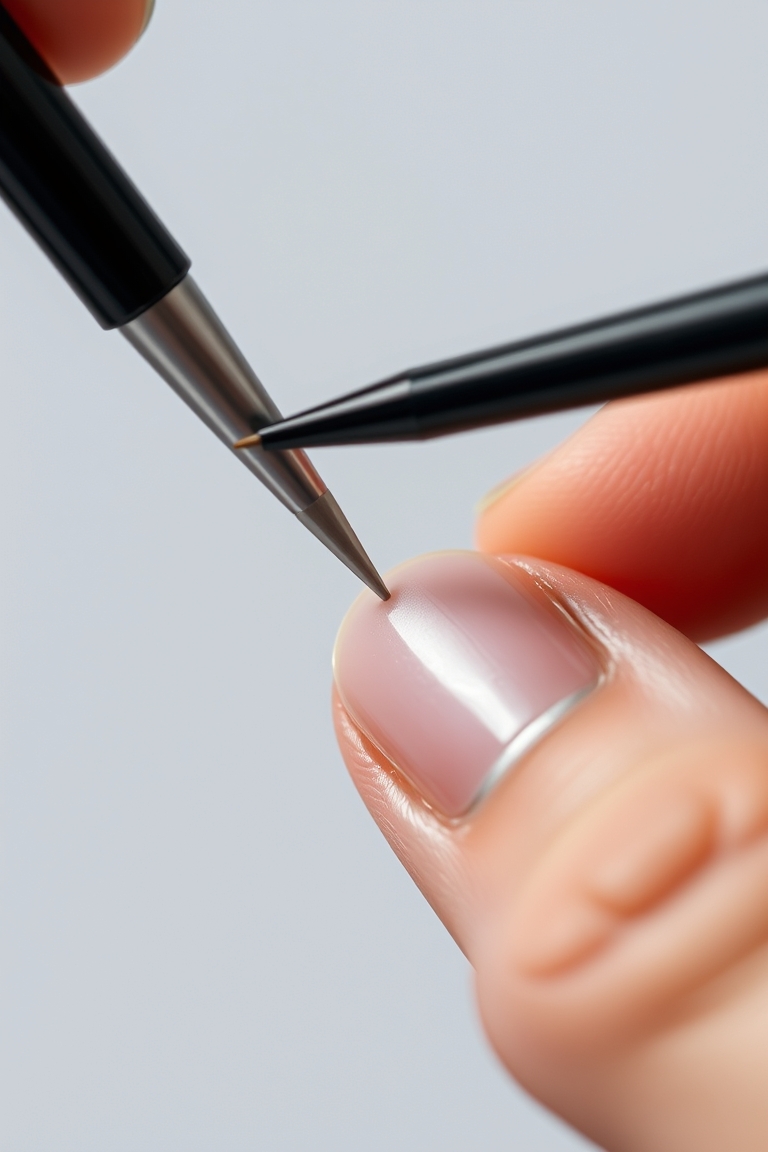
Choosing the Right Brushes
Brush quality matters. A smooth, fine tip allows you to make clean lines and tiny dots. I recommend a set of 2–3 brushes: a large flat brush for base coats, a fine tip brush for detailed work, and a dotting brush. Avoid cheap, stiff brushes that create uneven lines.


Base and Top Coats – The Invisible Layer
Before you even touch color, apply a thin layer of base coat. It protects the nail and provides a smooth surface for polish to adhere. After your design is complete, seal it with a top coat. This step not only adds shine but also extends the life of your manicure.
Building Your Starter Kit: Step‑by‑Step
1. Base & Top Coats – Pick a clear base and a clear top. Two can do the job.
2. Polish Selection – Start with three primary colors: a neutral, a bold, and a metallic. These give you a range of moods.
3. Tools – Add the brushes, dotting tool, and a small nail file.
4. Cuticle Care – A simple oil and push‑er set keeps the nail bed healthy.
5. Optional Extras – If you’re ready to experiment with gel, add a UV lamp and a gel kit.
When you’re assembling, think about flow. Place the most frequently used items at eye level, and store the less common items in the back. A simple drawer or a clear plastic case works well. I keep everything in a single container so I can take my kit on the go.
Mastering Basic Techniques
Once you have your kit, practice the following techniques. They form the building blocks of more complex designs.
- Single‑Color Polish – The foundation. Apply two coats, let dry, then top coat.
- Striping – Use a fine brush to create clean lines. Practice on a blank nail until your hand steadier.
- Dotting – A dotting pen or a small brush can create geometric patterns. Start with a 3×3 grid.
- Glitter & Rhinestones – Apply a thin layer of glue, place the sparkle, then seal with top coat.
- Stamping – Press a stamping plate onto a base coat. This is a quick way to add detail.
Remember, the key to mastering these skills is repetition. Set aside a few minutes each day for practice. Over time, your hand will develop steadiness and confidence.
Safety & Hygiene
Always sanitize your tools before use. A quick wipe with rubbing alcohol keeps the brushes and applicators clean. This prevents cross‑contamination and ensures a smooth application.
Organizing Your Workspace
A tidy workspace reduces mistakes. I use a small tray for brushes, a separate compartment for polish, and a dedicated spot for cuticle tools. A clean surface also speeds up the drying process because you can easily move from one step to the next.
Scaling Up: From Beginner to Intermediate
When you feel comfortable with the basics, you can start adding more items to your kit:
- Fine‑tipped brushes of varying sizes – For intricate line work.
- Airbrush kit – For a flawless, even finish.
- Color‑changing nail polishes – Add a fun twist to your designs.
- Matte and satin top coats – Expand your texture options.
- Professional nail file set – For a salon‑grade finish.
Keep experimenting. The more you practice, the more you’ll discover what works best for your style.
Learning Resources
Online tutorials and community forums are invaluable. Platforms like Nail Art provide a wealth of information on techniques, trends, and safety. I also follow a few seasoned nail artists on social media for fresh inspiration.
Maintaining Your Kit
Proper maintenance extends the life of your tools and keeps your kit efficient:
- Clean brushes after each use – Wash with warm soapy water or a brush cleaner.
- Check polish for clogs – Remove dried polish from bottles.
- Replace worn files – A dull file can damage nails.
- Store brushes flat – Prevents the bristles from bending.
By following these simple steps, you’ll keep your kit ready for your next creative session.
Choosing the Right Polishes
While the base and top coats are non‑negotiable, selecting the right color palette can make or break your design. Start with a neutral shade like a soft champagne or classic pale pink. These act as a backdrop and can be layered with other colors. A bold color—think electric blue, deep plum, or vibrant coral—adds drama. Finally, a metallic or holographic finish introduces a touch of glamour. When you mix, remember that darker shades often require a base coat to prevent staining, while lighter shades may benefit from a quick top coat to prevent fading.
Advanced Tool Additions
Once you’re comfortable with the basics, consider expanding your collection:
- Micro‑brushes (0.5–0.8 mm) – Perfect for fine lines, stenciling, and tiny dots.
- Stencil kits – Pre‑cut shapes like hearts, stars, or florals that can be pressed onto a wet polish layer.
- Color‑changing polishes – These shift hue with temperature or light, adding a dynamic element.
- Texture top coats – Matte, satin, or glitter top coats change the finish without additional glitter.
- Professional nail file set (diamond, emery, glass) – Provides a smoother, salon‑grade filing experience.
These tools allow you to create more intricate designs and experiment with new trends.
Common Mistakes to Avoid
Even seasoned artists stumble on these pitfalls:
- Skipping the base coat – Leads to uneven polish adhesion and nail damage.
- Applying too much polish – Causes streaks and prolongs drying time.
- Using a single brush for all tasks – Blurs lines and reduces precision.
- Neglecting hygiene – Can spread bacteria or fungal infections.
- Forgetting to seal with top coat – Results in chips and a dull finish.
Mindful practice and attention to detail will help you sidestep these errors.
Creative Design Ideas for Beginners
Here are five simple projects you can tackle right away:
- Classic French with a Twist – Use a thin white strip on the tip, then add a subtle pastel shade to the middle.
- Geometric Grid – Paint a base color, then use a dotting tool to create a 3×3 grid of small dots.
- Glitter Ombre – Start with a light base, then blend in glitter polish from light to dark.
- Stenciled Florals – Press a floral stencil onto a wet base coat and fill with a contrasting color.
- Polka Dot Champagne – Base a champagne shade, then dot tiny white dots across the nail.
These designs are forgiving, quick to learn, and look polished.
Storing and Transporting Your Kit
Portability is key for artists on the go. Use a small, leak‑proof case with compartments. Keep the base and top coats in one section, polishes in another, and tools in a separate tray. A silicone mat inside prevents scratches. When traveling, replace the base coat with a quick‑dry formula to avoid smudging.
Safety First: Protecting Your Skin and Nails
Nail polish contains solvents that can irritate skin. Always work in a well‑ventilated area and consider wearing gloves if you have sensitive skin. For gel polish, ensure the lamp’s UV output is within safe limits; most modern LED lamps emit minimal UV radiation.
Tips for Long‑Lasting Manicures
- Apply thin layers – Thin coats dry faster and reduce clumping.
- Let each coat dry fully – Prevents smudging and tackiness.
- Use a top coat with UV protection – Helps shield against fading.
- Apply a cuticle oil before the base coat – Keeps nails hydrated.
- Avoid harsh chemicals – Use acetone‑free removers when possible.
FAQs
- What are the essential nail art tools for beginners? The core essentials include base and top coats, a few high‑quality polishes, a set of fine brushes, a dotting tool, cuticle care items, a file, and a small cleaning brush. Optional items like a UV lamp or stamping plates can be added as you advance. Keeping these items in a single, labeled case ensures you can start a project instantly.
- How do I choose the right polish colors? Start with a neutral, a bold, and a metallic shade. These give you a range of moods and can be mixed for unique effects. Consider your skin tone and personal style. Test a small amount on a fingertip to see how the color looks under natural light before committing to a full bottle.
- Can I use regular nail polish for gel designs? No, gel designs require gel polish and a UV/LED lamp. Regular polish will not cure properly under the lamp and will peel or flake. If you want a long‑lasting look, invest in a gel kit and follow the lamp instructions carefully.
- What’s the best way to keep brushes sharp? Wash them thoroughly after each use, dry them completely, and store them flat. Periodically replace brushes that show signs of fraying. A clean brush delivers smoother lines and reduces the risk of smudging.
- How often should I replace my nail file? Replace it when the surface becomes dull or develops cracks, which can damage nails during filing. A new file ensures a smooth finish and prevents accidental cuts to the nail bed.
Leave a Reply