When you think of nail art, most people picture a bustling salon, a pricey kit, and an hour‑long appointment. The truth is that the best cute nail designs to do at home can be achieved with a handful of everyday items and a little patience. I’ve spent countless evenings experimenting with polishes, brushes, and household tools, and the result? A collection of designs that look like they were created by a pro, but you can copy them right from your kitchen counter.
Essential Tools for At‑Home Nail Designs
Before you dive into the creative side, let’s inventory what you actually need. A professional set is nice, but the core of any nail art kit can be assembled from things you already own:
- Toothpicks or Bobby Pins: These are the unsung heroes for tiny dots, hearts, and fine lines. Choose wooden toothpicks for a natural look or metal bobby pins for a more precise edge.
- Clear Top Coat: The backbone of durability. Look for a formula with a high gloss finish and a quick‑dry time, such as Essie 2‑in‑1 Top Coat or OPI Ultimate Shine.
- Makeup Sponges: Small, angled wedges work wonders for gradients. A brand like Beautyblender offers a range of sizes that fit comfortably in your palm.
- Clear Tape or Sticky Notes: Use them to create sharp geometric lines. Clear packing tape is ideal because it’s thin and doesn’t leave residue.
- Rubbing Alcohol and Cotton Pads: A must for prepping the nail surface and cleaning up stray polish. A 70% isopropyl solution is perfect.
- Cuticle Oil: A small bottle of almond or jojoba oil keeps the skin around the nail hydrated, preventing flaking.
Easy Cute Nails for Absolute Beginners
Starting with forgiving designs builds confidence and reduces frustration. Below are three staples that are both beginner‑friendly and Instagram‑ready.


The Classic Polka Dot
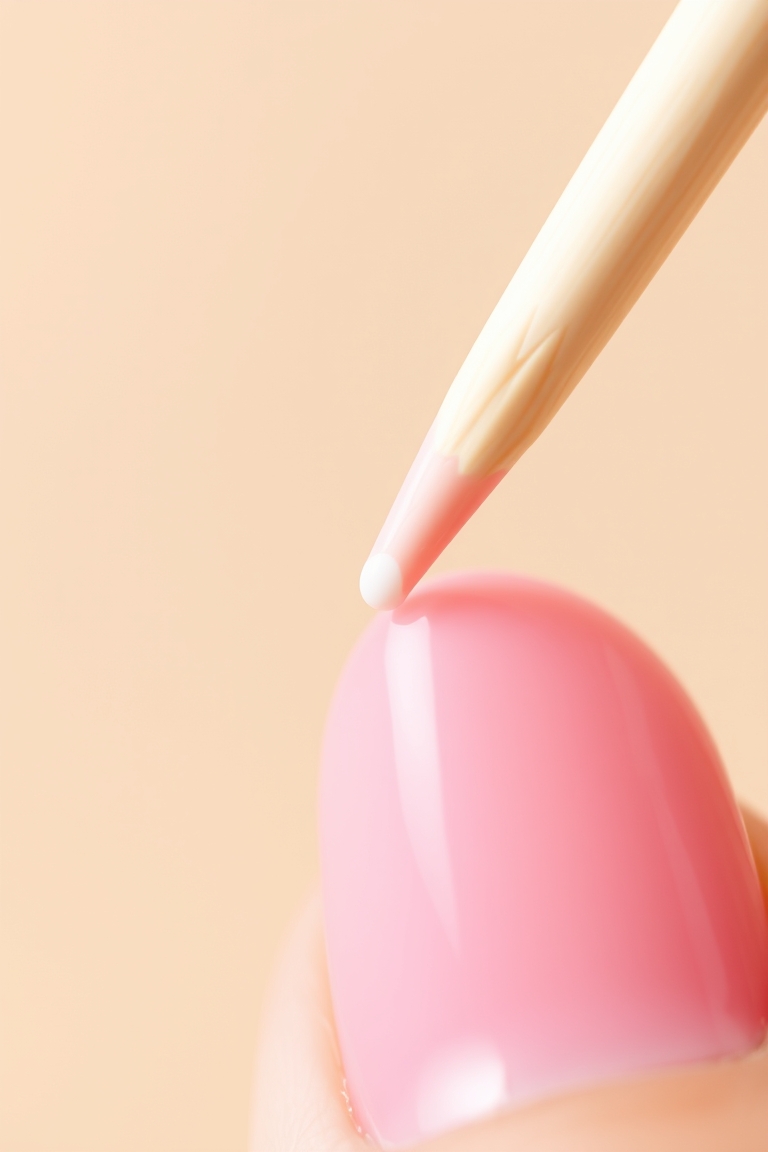
Polka dots are the building blocks of countless nail looks. After a base coat dries, dip the tip of a toothpick into a contrasting color. Gently press the tip onto the nail, then lift to release the dot. For a minimalist vibe, place a single dot near the cuticle; for a playful confetti feel, scatter dots across the entire nail. If you’re working with a lighter base, a darker polish will create a striking contrast.
The Minimalist Half‑Moon
This negative‑space design is a subtle nod to modern aesthetics. Paint a solid color over the entire nail, leaving the lunula (the crescent-shaped white area near the cuticle) untouched. If you accidentally cover it, use a very fine brush dipped in acetone to carefully wipe the area back. Once the polish dries, seal it with a clear top coat for a polished finish.
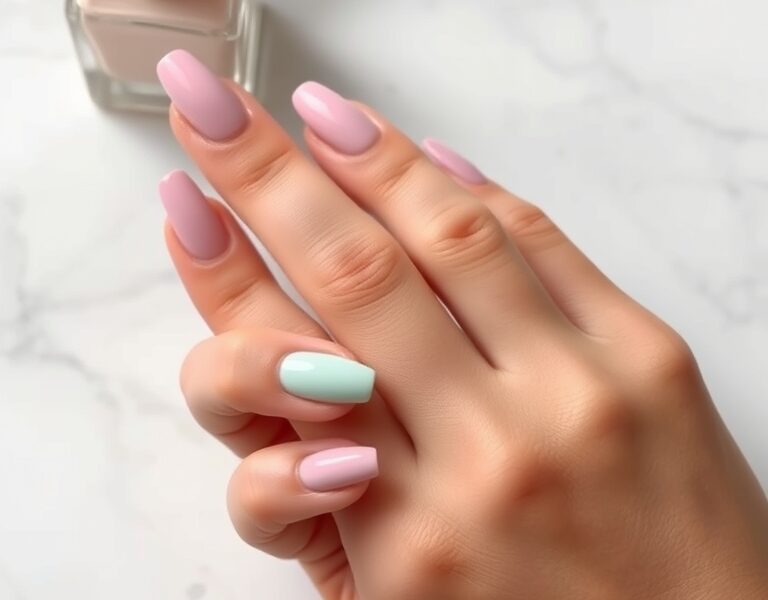
Simple Pastel Ombre
Ombre nails can seem intimidating, but a makeup sponge simplifies the process. Choose two complementary pastel shades, such as blush pink and mint green. Lightly dampen a small sponge with the first color, then the second, and dab the sponge onto the nail in a gentle, bouncing motion. The colors will blend where they meet, creating a soft gradient. Finish with a top coat to lock in the effect.
Advanced Home Nail Art Ideas for More Detail
Once you’ve mastered the basics, it’s time to layer in more complexity. The key is patience and the ability to work in thin layers.
Hand‑Drawn Tiny Hearts
Hearts are a staple for anyone searching for cute nail designs to do at home. To craft a perfect heart, place two tiny dots side‑by‑side. Then, using a toothpick, drag the bottom of both dots down toward a single point in the center. Practice a few times to achieve symmetry. The result looks as if you spent an hour at a salon, but it takes only a few minutes.
Abstract Swirls and Waves
Abstract art offers freedom—mistakes become part of the design. Use a thin detailing brush or a toothpick to draw organic lines across the nail. Mix three shades of the same hue (e.g., navy, royal blue, and sky blue) to create a three‑dimensional feel. Start from one corner, let the line flow naturally to the other side, and layer a subtle gloss top coat to bring the swirls to life.
Geometric Color Blocking
For lovers of clean lines, color blocking is a game changer. Tape a diagonal or vertical line across the nail with clear tape. Paint one side a bold color (think cobalt or fuchsia) and the other a neutral (like ivory or taupe). Peel the tape while the polish is still tacky to reveal a razor‑sharp edge. This technique allows you to experiment with contrast without needing a steady hand.
Pro Tips for Long‑Lasting DIY Manicures
Chipping is the most common complaint from DIY nail artists. By following these steps, you can extend the life of your manicure to over a week.
- Prep the Surface: Start with a clean canvas. Buff the nail lightly to remove shine, then wipe with rubbing alcohol to eliminate oils.
- Thin Layers: Thick coats trap moisture, leading to bubbles and peeling. Apply two thin layers, allowing each to dry completely.
- Cap the Edge: Run your brush along the very tip of the nail to seal the polish and prevent lifting.
- Top Coat: Finish with a high‑quality top coat, such as Seche Vite or Essie 2‑in‑1 Top Coat, to add shine and protect the design.
If you’re curious about the chemistry behind nail polish, check out the Wikipedia article on polymers for a deeper dive into how these polymers form a protective film.
Seasonal Inspiration for Your Nails
Changing your designs with the seasons keeps the process exciting. Here are suggestions for each season:
- Spring: Think pastel daisies. Paint a light yellow base, then use a toothpick to dot white circles for petals and a tiny green dot for the center.
- Summer: Bright, tropical vibes. Use a bright coral base, then add a tiny green leaf shape with a toothpick for a fresh look.
- Autumn: Warm, earthy tones. A deep amber base with a matte top coat, accented by a tiny gold leaf or leaf shape.
- Winter: Cool blues and silvers. Paint a pale blue base, then use a toothpick to create a tiny white snowflake and a silver crescent moon.
Common Mistakes to Avoid
Even seasoned DIYers fall into traps. Here are the most frequent errors and how to sidestep them:
- Applying Top Coat Too Soon: If the design is still wet, the top coat will smudge colors. Wait at least 5–10 minutes before sealing.
- Too Much Polish on the Tool: A dripping toothpick creates oversized, messy dots. Wipe excess polish off before touching the nail.
- Neglecting Cuticles: Dry cuticles ruin a polished look. After the nails dry, massage a few drops of cuticle oil over the area for a healthy glow.
For more nail health tips, visit our nails made simple guide.
Step‑by‑Step: The “Celestial Night” Look
This dreamy design looks complex but is surprisingly simple to execute. It’s a favorite for those who love a touch of sparkle.
- Base Coat: Apply a clear base coat to protect the nail and provide a smooth surface.
- The Night Sky: Paint a deep navy or black polish. Let it dry for 10 minutes.
- The Stars: Using a toothpick and white polish, create tiny, tiny dots across the nail. Vary the spacing for a natural star field.
- The Crescent Moon: On the ring finger, use the edge of a bobby pin to draw a small C‑shape. Fill it carefully with a soft gray or silver polish.
- The Finishing Touch: Apply a generous layer of clear top coat. This will give the white dots a subtle glow and blend the design slightly for a dreamy effect.
How to Fix Mistakes Without Starting Over
Everyone has that moment when a nail looks off. Instead of scrapping the whole nail, try these quick fixes:
- Smudge Removal: Dip a very thin brush or a toothpick in acetone and gently carve the mistake away. Work slowly to avoid damaging the surrounding polish.
- Cuticle Over‑Paint: If you’ve painted over your skin, wait until the polish dries, then use a clean‑up brush dipped in acetone to wipe around the cuticle.
- Edge Touch‑Up: For a crisp line, use a fine brush and a small amount of top coat to re‑cap the nail edge.
Choosing the Right Colors for Your Skin Tone
Color selection can elevate your nail art. Here’s a quick guide:
- Cool Skin Tones: Berries, royal blues, crisp whites, and cool grays. These shades complement the undertones and make cute nail designs to do at home pop.
- Warm Skin Tones: Corals, olive greens, golds, and warm terracotta. They add warmth and depth to the design.
- Neutral Skin Tones: Neutrals like nude, mauve, and soft grey work for any look, ensuring the design feels cohesive.
FAQ
What are some of the easiest cute nail designs to do at home?
The easiest designs include simple polka dots using a toothpick, minimalist half‑moons, and ombre effects created with a makeup sponge. These require minimal tools and are very forgiving for beginners.
How can I make my DIY nail art last longer?
To increase longevity, always clean your nails with rubbing alcohol before starting, apply polish in thin layers, and remember to “cap the edge” of the nail. Finishing with a high‑quality top coat is essential.
Do I need expensive brushes for home nail art?
Not at all. You can use household items like bobby pins, toothpicks, and makeup sponges to create most common designs. Professional brushes are helpful for intricate details, but not necessary for beginners.
How do I stop my nail polish from bubbling?
Bubbles usually happen when the polish is applied too thickly or if you shake the bottle too vigorously. Instead of shaking, roll the bottle between your palms to mix the pigment. Apply thin, even layers and avoid blowing on your nails to dry them, as this can trap moisture.
What is the best way to remove nail art without damaging nails?
Use an acetone‑based remover for glitter or dark colors, but avoid soaking your nails for too long. Soak a cotton pad and hold it on the nail for a few seconds to dissolve the polish before wiping it away. Always follow up with a cuticle oil or hand cream to restore moisture.
Leave a Reply